Imagine stepping into a shower that feels like a spa, right in your Flemington home. You don’t need a million‑dollar budget to make that happen—just a clear plan and the right crew.
Most homeowners jump in blind, end up with leaky tiles or a design that screams “meh.” We’ve mapped out every step, from picking the perfect tile to sealing the final joint, so you can skip the guesswork.
Ready to see how a smart roadmap turns a cramped bathroom into a daily retreat? Keep reading and discover the exact checklist that will get your new shower under construction this spring.
Assessing Your Space, Layout, and Budget
Measure Twice, Cut Once
Start by pulling out a tape measure and sketching the bathroom on a napkin. Note the width, depth, and ceiling height—those three numbers dictate everything from shower size to tile choice. Don’t forget the door swing and any windows; a mis‑calculated clearance can turn a dream shower into a daily frustration.
Next, walk the perimeter and mark where existing plumbing, vent stacks, and structural walls sit. A quick visual check for studs, joists, and any hidden obstacles saves you from costly surprises when the demolition crew shows up.
- Floor square footage
- Wall lengths and any recesses
- Location of water supply lines
- Drain pipe position
- Clearance for doors and fixtures
Set a Realistic Budget
Before you fall in love with marble tiles, ask yourself how much you’re willing to spend on the whole project—not just the vanity. Break the total into chunks: materials, labor, permits, and a contingency fund. This way you can see where to splurge (like a rain‑shower head) and where to save (perhaps a prefabricated shower pan).
Use a simple spreadsheet or a notebook. List each item with a low, high, and most‑likely cost. Add a 10‑15% buffer for the unexpected—because every remodel throws a curveball.
- Shower enclosure (prefab vs. custom)
- Tile and grout
- Plumbing fixtures
- Labor rates in Flemington
- Permit fees
- Contingency (10‑15%)
Selecting the Perfect Shower Style, Materials, and Fixtures
Shower Styles That Sell
First, decide if you want a walk‑in, a curbless wet room, or a classic stall. Each option changes the flow of the bathroom and the feel you get each morning.
- Walk‑in: Open, airy, perfect for a modern look.
- Curbless wet room: Seamless transition, great for accessibility.
- Traditional stall: Saves space, easy to enclose.
Materials That Stand Up
Tile is the star, but the backing matters just as much. Choose a substrate that won’t crack under weight or moisture.
- Porcelain tile: Hard, low‑maintenance, works with most designs.
- Natural stone: Adds luxury, needs a good sealant.
- Glass panels: Modern vibe, but watch for water spots.
Fixtures That Make a Statement
Hardware can turn a plain shower into a focal point. Pick finishes that complement your style and survive daily use.
- Brushed nickel: Subtle, hides fingerprints.
- Oil‑rubbed bronze: Warm tone, adds depth.
- Matte black: Bold, contemporary edge.
Designing the Plumbing and Drainage Blueprint
Before you even think about tile, you need a solid pipe plan. Measure the existing drain stack and note any offsets—those little quirks can turn a smooth install into a nightmare. Local building codes in Flemington demand a minimum 1/4‑inch slope for every foot of horizontal run, so grab a level and mark the pitch now.
Core Plumbing Steps
- Locate the main water shut‑off and map out supply lines for the new valve.
- Size the drain pipe: 2‑inch for a standard shower, 3‑inch if you’re adding a bench or multiple heads.
- Plan a vent pipe to prevent suction; a 1‑inch vent usually does the trick.
Once the pipe routes are sketched, run a dry fit with PVC or copper to catch hidden obstacles—like joists or HVAC ducts—before you cut anything. A quick test with water will reveal low spots in the slope; fix them now or you’ll be dealing with standing water later.
Checklist Before the Walls Go Up
- Confirm the shower pan’s drain location matches the pipe layout.
- Mark the exact spot for the mixing valve; keep it at least 6 inches from the wall to allow easy access.
- Double‑check that all connections are slip‑jointed and sealed with plumber’s tape.
Choosing Tiles, Grout, and Waterproofing Systems
Tile Types That Hold Up in Flemington
When you walk into a new shower, the first thing you notice is the tile. Pick a material that can stand up to daily water exposure and the occasional slip‑and‑slide. Ceramic and porcelain are budget‑friendly, while natural stone adds a luxe feel—just remember stone needs a good seal.
Here’s a quick cheat sheet for tile choices:
- Ceramic – easy to install, wide color range.
- Porcelain – denser, less porous, great for high‑traffic showers.
- Natural stone (marble, slate) – stunning, but requires regular sealing.
- Glass mosaic – visual depth, best as an accent.
Grout: The Unsung Hero
Grout is the glue that keeps your tiles from wobbling, but it can also become a breeding ground for mold if you pick the wrong kind. Epoxy grout resists stains and water absorption, though it’s a bit pricier and tougher to work with. For most homeowners, a high‑performance cement grout with a penetrating sealant does the trick.
Key points to remember:
- Match grout color to tile for a seamless look, or go dark for contrast.
- Apply a sealant within 24‑48 hours to lock out moisture.
- Re‑seal every 1‑2 years in a wet environment.
Waterproofing Systems That Actually Work
Skipping a proper waterproofing layer is a fast track to a leaky nightmare. Choose a system that creates a continuous barrier from the floor up to the walls, and don’t forget the niche and bench areas.
Two reliable options:
- Sheet membrane – a roll‑out product that’s quick to install and offers a solid, puncture‑resistant shield.
- Liquid waterproofing – a brush‑on or roll‑on coating that seeps into every crevice, perfect for irregular shapes.
Whichever you pick, test the seal with a simple water bucket test before you set the first tile. If water stays on the surface, you’re good to go.
Step‑by‑Step Installation: Demolition, Framing, and Waterproofing
Demolition: Clear the Canvas
First thing’s first—rip out the old shower like you’re pulling weeds. Turn off the water, disconnect the drain, and protect the rest of the bathroom with drop cloths.
Don’t waste time guessing what’s behind the wall; use a stud finder and a flashlight to locate joists and hidden pipes.
- Remove tile, backer board, and any damaged framing.
- Dispose of debris in a rented dumpster to keep the site tidy.
- Inspect the subfloor for rot; replace any compromised sections before you move on.
Framing: Build a Strong Skeleton
With the old shower gone, you can start shaping the new one. Measure twice, cut once—the framing determines the shower’s size and where the plumbing will sit.
Use 2×4 studs to create a sturdy curb and a niche if you want built‑in shelves.
- Secure the curb to the floor joists with 3‑inch deck screws.
- Install blocking for the shower valve and any future grab bars.
- Leave a ¼‑inch gap between the framing and the wall for the waterproof membrane.
Waterproofing: Seal the Deal
Now the real protection begins. A good waterproof system stops leaks before they ever touch the drywall.
Apply a liquid membrane or a sheet system, overlapping each layer by at least 2 inches.
- Start at the floor, then work up the walls, finishing with the ceiling.
- Seal all seams, corners, and the curb with a high‑quality sealant.
- Allow the membrane to cure fully—usually 24 hours—before installing tile.
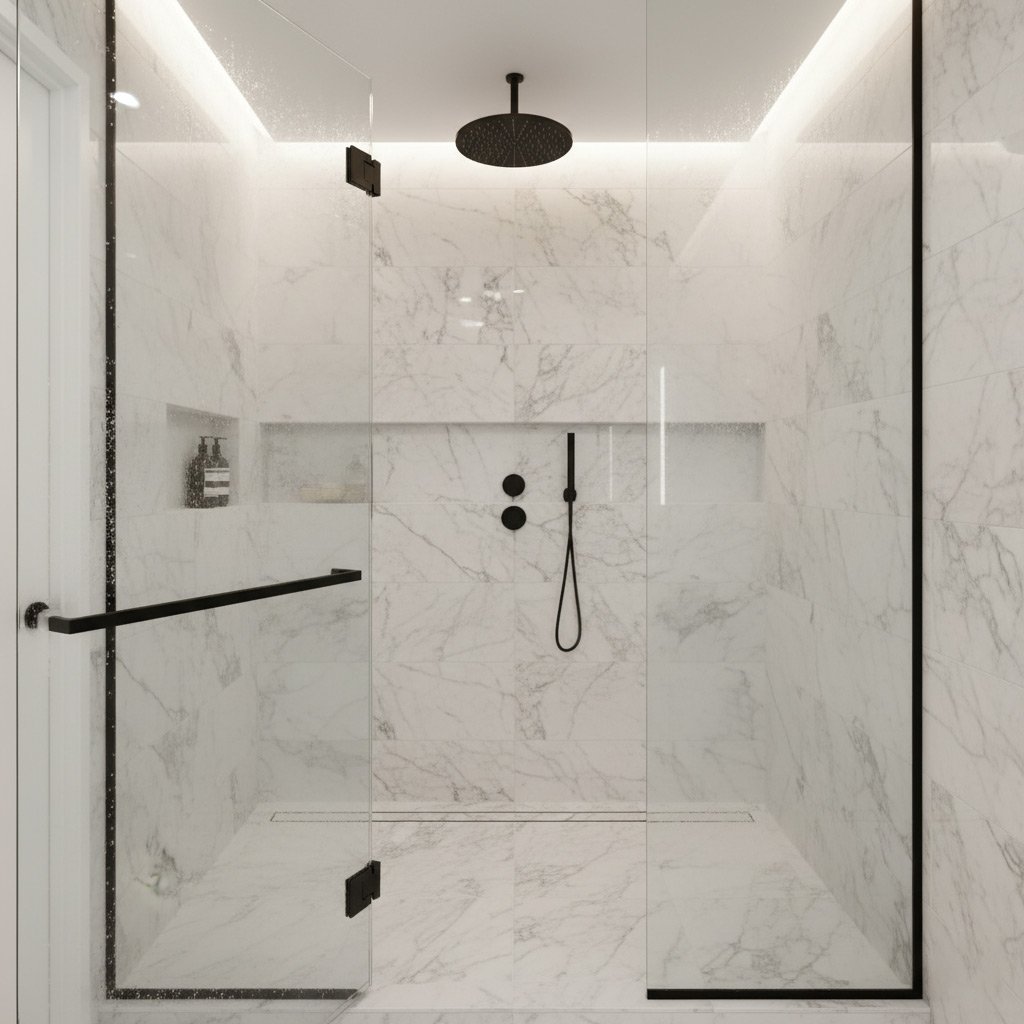
Case Study: Turning a Flemington Bathroom into a Spa‑Like Retreat
Before & After Snapshot
When the Martins walked in, their bathroom was a cramped, tile‑studded box with a leaky shower curtain. We turned it into a 6‑ft. walk‑in rain shower that feels like a boutique spa.
Key visual changes:
- Floor‑to‑ceiling glass walls for an open feel.
- Large, matte‑black rainhead and handheld combo.
- Heated pebble floor that stays warm all winter.
What Made It Work
First, we mapped the existing plumbing and discovered a hidden pipe that could be rerouted for a linear drain. That saved $1,200 in extra trench work.
Next, we chose a large‑format porcelain tile in a soft dove gray. It required fewer grout lines, which meant less maintenance and a cleaner look.
Finally, we sealed every joint with a premium waterproofing membrane and ran a moisture sensor. The result? Zero leaks after the first rainstorm.
Final Words
Before you swing the hammer, double‑check that every permit is in hand and your budget still matches the scope. A missed inspection can stall the project for weeks, and nobody wants that.
Keep the Momentum
- Order tiles and fixtures early – lead times can surprise you.
- Schedule a walkthrough with your plumber to confirm pipe runs.
- Set a realistic timeline and stick to it; small delays add up fast.
When to Call the Pros
If you hit a snag with drainage or notice a leak, don’t guess. Call a specialist who knows Flemington’s code.
- For stubborn clogs, check our drain cleaning service.
- Spot a drip? Our leak detection team can locate it before water damage spreads.
- Need a full‑service remodel? A licensed contractor will keep the work tight and on budget.
People Also Ask
What factors should I consider when assessing my bathroom space for a new shower?
Evaluate the overall square footage, existing plumbing locations, and any structural constraints such as load‑bearing walls. Also set a realistic budget that includes materials, labor, and contingency for unexpected issues.Which shower styles are most popular among Flemington homeowners?
Walk‑in showers with frameless glass enclosures and curbless designs are trending for their sleek look and accessibility. For a spa‑like feel, consider a steam‑ready tile shower with multiple body jets.How do I determine the right waterproofing system for my shower remodel?
Choose a waterproofing membrane that meets local building codes and is compatible with your tile and grout selections. A liquid‑applied or sheet membrane with a proper drainage slope will protect against leaks and mold.Can I install a new shower myself, or should I hire a professional?
While minor cosmetic updates can be DIY, installing plumbing, framing, and waterproofing requires licensed expertise to ensure code compliance and prevent costly water damage. Hiring a professional remodeler guarantees a lasting, leak‑free result.What is the typical timeline for a complete shower installation?
From demolition to final tile grouting, most residential shower projects take 2 to 4 weeks, depending on material lead times and the complexity of the plumbing layout. Proper planning and a reliable contractor keep the schedule on track.Flemington Bathroom Remodel brings over a decade of specialized bathroom renovation experience to homeowners throughout Flemington, NJ. Their team combines skilled craftsmanship with a deep understanding of local design trends to deliver functional, stylish spaces. Committed to personalized service, they work closely with each client to ensure projects reflect the unique character of the community.
Need Bathroom Remodel?
We restore comfort and safety to homes in Flemington, NJ and surrounding communities (08822, 08844, 08848, 08861, 08873) with prompt, reliable service. Our technicians arrive on schedule and complete the job efficiently so you can get back to daily life.
Get Bathroom Quote