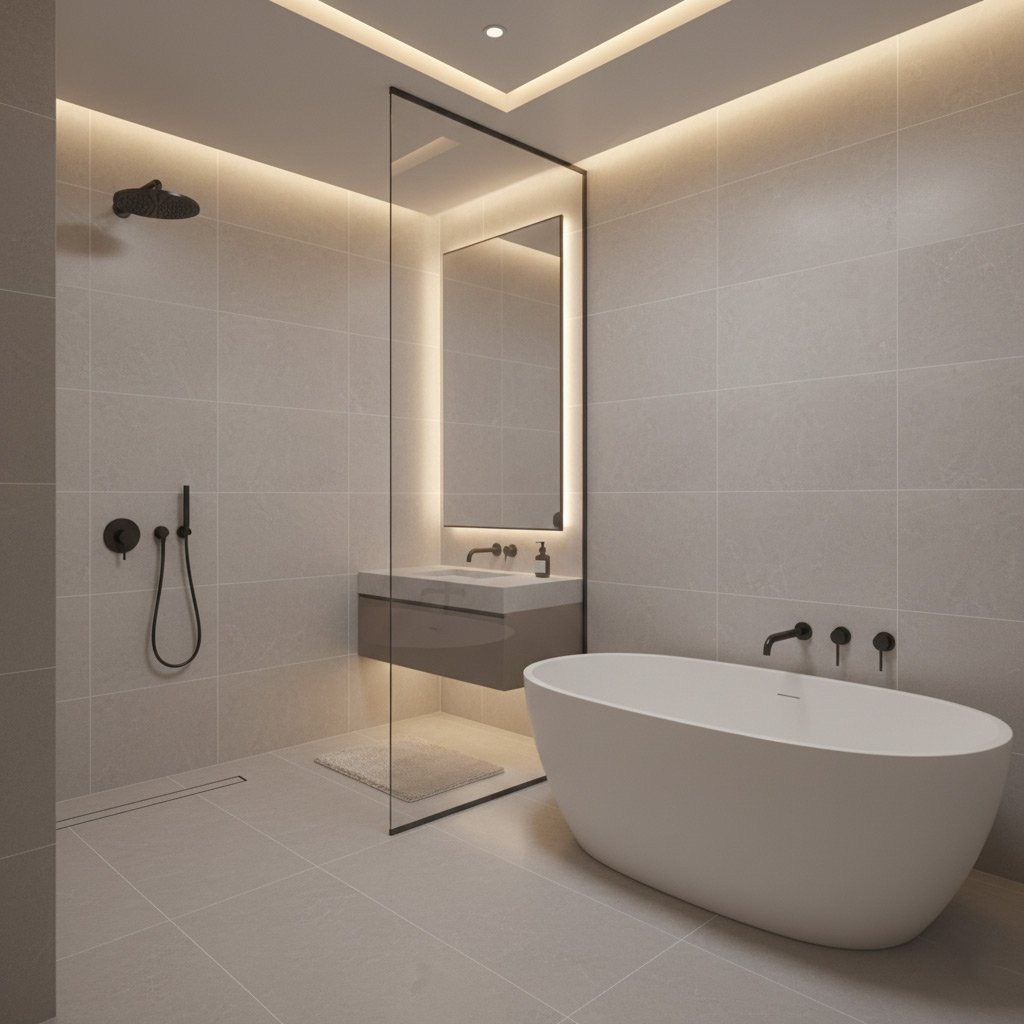
Picture this: you pull the shower curtain aside and are greeted by a sleek, glass‑enclosed shower that feels like a mini‑spa every morning. No more stepping over a bulky tub to get to the faucet—just a clean, open space that makes your bathroom look twice its size.
In Flemington, NJ, homeowners are swapping tubs for showers faster than you can say “home‑value boost.” A well‑executed conversion not only frees up precious square footage, it also adds a modern edge that buyers love.
What most people miss is that the magic lies in the details—proper waterproofing, the right shower pan, and a layout that flows with your daily routine. Get those pieces right, and you’ll avoid costly re‑work and enjoy a flawless finish.
Ready to uncover the exact steps that turn a dated tub into a stylish shower oasis? Keep reading and you’ll discover the secrets the pros don’t want you to miss.
Assessing Your Space, Budget, and Local Building Codes
First thing’s first – pull out the tape measure and map your bathroom floor like you’re planning a heist. Know the exact dimensions of the tub footprint, the wall clearances, and the door swing. A quick sketch with measurements will tell you if a walk‑in shower fits or if you need to shave a few inches off the vanity.
Measure Twice, Cut Once
- Length, width, and height of the existing tub
- Distance from the tub to the nearest wall, door, and window
- Ceiling height – low ceilings may limit glass enclosure options
Next, sit down with your wallet. A typical tub‑to‑shower conversion in Flemington runs between $7,000 and $12,000, but the final number hinges on three things: the shower pan you choose, the level of waterproofing, and any custom tile work. Ask yourself if you’re comfortable handling a surprise expense or if you need a firm cap before the contractor starts swinging a hammer.
Know the Rules Before You Break Ground
Flemington’s building department isn’t a suggestion box – they enforce clear standards for drainage slope, venting, and waterproofing membranes. Grab a copy of the local code or call the municipal office to confirm:
- Minimum floor slope (usually 1/4 inch per foot)
- Required waterproofing membrane type
- Permit fees and inspection schedule
Getting the paperwork right the first time saves you from costly re‑work and keeps the project moving smoothly.
Selecting the Ideal Shower Pan, Base, and Drain System
Know Your Pan Options
Before you pick a pan, ask yourself: do you want a prefabricated unit that slides in like a puzzle piece, or a custom‑molded base that hugs every contour of your floor? Prefab pans are fast, cheap, and come in standard sizes—perfect for a quick flip. Custom bases cost more but give you the freedom to play with unique shapes, like a stepped entry or a low‑profile “walk‑in” look.
- acrylic or fiberglass – lightweight, easy to install, good for DIY.
- cast iron – heavy, durable, holds heat longer, ideal for a spa vibe.
- stone‑cored – premium feel, natural stone look, requires professional handling.
Drain System Matters
The drain is the silent hero of any shower. A linear drain runs the length of the wall, giving a sleek, modern aesthetic and easier cleaning. A traditional center drain is cheaper and fits most prefabricated pans, but you’ll need a well‑planned slope to avoid puddles.
- Choose a PVC or ABS pipe that matches your home’s plumbing code.
- Consider a pop‑up or quarter‑turn drain cover for easy maintenance.
- Make sure the drain’s throat size matches the pan’s outlet—mismatch means leaks.
Base Height and Floor Transition
Base height determines how the new shower meets the rest of the bathroom floor. A low‑profile base (½‑inch to 1‑inch) creates a seamless transition, perfect for a walk‑in feel. A raised base (2‑inch or more) gives you room for extra plumbing, but you’ll need a step or a small ramp.
Measure twice, plan the slope, and pick a pan that fits your budget without sacrificing the look you want. The right combo of pan, base, and drain will keep water where it belongs—inside the shower, not under your new flooring.

Mastering Waterproofing: Membranes, Sealants, and Proper Sloping
Why Waterproofing Matters
One slip in the waterproofing plan and you’ve got a bathroom that looks like a swamp. Moisture loves any tiny gap—it finds it, spreads it, and ruins everything from drywall to flooring.
In Flemington’s climate, freeze‑thaw cycles make a leaky shower a ticket to costly repairs. The goal is simple: keep water where it belongs, inside the pan.
- Prevent mold growth
- Guard against structural rot
- Maintain resale value
Choosing the Right Membrane & Sealant
Think of the shower pan as a bathtub’s younger, tougher sibling. A liquid‑applied membrane creates a seamless skin that bends around corners without seams.
When you pick a sealant, go for 100% silicone or a hybrid polymer that stays flexible for years. Don’t settle for “budget” caulk—it cracks, shrinks, and invites leaks.
- Sheet membranes (e.g., PVC, CPE) for high‑traffic homes
- Liquid membranes for irregular shapes and custom niches
- Silicone sealant for glass-to-wall joints
Getting the Slope Right
The floor must guide water toward the drain, not away from it. A slope of 1/4 inch per foot is the sweet spot—steep enough to move water, gentle enough to stay comfortable underfoot.
Use a laser level or a simple string line to check the pitch before you pour the mortar. Even a half‑inch error can cause pooling, and that’s a nightmare you don’t want.
- Mark the high point at the wall, low point at the drain
- Build a tapered screed with a mixing paddle
- Verify slope with a level after each layer
Choosing Fixtures, Glass Enclosures, and Design Details that Boost Value
When you pick a showerhead, think performance meets style. A rain‑type head adds a spa feel, while a handheld sprayer gives flexibility for kids or pets. Pair them with brushed‑nickel or matte‑black finishes to match the hardware you already own – it’s a cheap way to look custom.
Glass Enclosure Options
Clear glass makes a tiny bathroom feel larger; frosted panels add privacy without shrinking the space. Choose a frame‑less system for a sleek look, or a slim aluminum frame if you need extra support on a longer span.
- Full‑wall frameless – high impact, low visual weight.
- Semi‑framed – budget‑friendly, still modern.
- Pivot‑door with a single hinge – easy access, minimal hardware.
Don’t forget the hardware. Soft‑close hinges and a quality towel bar can be the difference between “nice” and “wow” when a buyer walks in. Small upgrades like a built‑in niche for shampoo keep the shower tidy and add perceived value.
Step‑by‑Step Installation Process: Demolition, Framing, Plumbing, and Finishing
Demolition
First, turn off the water supply and disconnect the tub’s faucet, drain, and overflow. Remove the tub in one piece if possible; it saves time and reduces dust.
Clear out the old mortar, tile, and any damaged backer board. Leave the subfloor exposed so you can see any rot or squeaks that need fixing.
- Wear a dust mask and safety glasses.
- Use a reciprocating saw for the tub’s flange.
- Bag all debris for proper disposal.
Framing & Plumbing
Once the space is bare, inspect the joists. Reinforce any weak spots with 2×4 blocking before you build the new shower curb.
Install a new waterproof membrane on the floor, then frame the shower pan walls to the correct height—usually 6‑8 inches for a comfortable step‑in.
- Run new supply lines for the shower valve; keep them at least 2 inches away from the wall studs.
- Fit the drain assembly with a proper slope of 1/4 inch per foot toward the trap.
- Test for leaks before you cover anything.
Finishing
Lay the shower pan, making sure the edges sit flush with the curb. Apply a thin‑set mortar and embed the waterproof membrane, then let it cure.
Tile the walls, seal the grout, and install the glass enclosure. Finish with a sleek showerhead and a brushed‑nickel faucet—instant curb appeal for any Flemington home.
Case Study: Converting a 1970s Tub into a Spa‑Like Shower in Flemington, NJ
The Starting Point
When the Johnson family opened the door to their 1970s bathroom, they found a cracked enamel tub, outdated tile, and a leaky faucet that dripped like a metronome. Their goal? Turn the cramped space into a sleek, spa‑inspired shower without blowing the budget.
First, we measured the 5’ × 7’ footprint and discovered a hidden 2‑inch gap behind the wall that could accommodate a low‑profile shower pan. The local building department in Flemington required a minimum 1/4‑inch slope toward the drain, so we factored that into the framing plan.
The Turnaround
We chose a linear acrylic shower pan with a concealed drain to keep the floor level and maintain a clean look. The pan’s sloped underlayment eliminated the need for a separate mud bed, saving both time and material.
Next, we installed a liquid waterproofing membrane over the studs, followed by a fiberglass reinforcement tape at all seams. The result was a seamless barrier that passed the 24‑hour flood test on the first try.
- Custom glass enclosure with a frameless, tempered panel
- Rain‑head showerhead paired with a handheld wand
- Heated towel rack and LED accent lighting
Results & ROI
After the conversion, the Johnsons reported a 30‑second shave time cut thanks to the open layout and better water flow. The new shower added an estimated 12% to their home’s resale value, according to the latest Flemington market data.
Most importantly, the waterproofing held up during a heavy rainstorm that flooded the basement—no leaks, no damage. The family now enjoys a daily “mini‑spa” experience, and the project stayed under the $18,000 budget they set.
Final Words
Before you swing that hammer, remember the three pillars that keep a conversion from turning into a nightmare: waterproofing, proper drainage, and smart layout. Nail each one and the rest falls into place.
Quick Checklist
- Confirm local code clearance – a quick call to the Flemington building department saves weeks of re‑work.
- Test the slope on your chosen pan – 1/4" per foot is the sweet spot.
- Seal every joint with a high‑quality membrane and silicone.
When you’re ready to see the full suite of services that keep your bathroom humming, check out our Tub to Shower Conversions page. It’s the hub for everything from design advice to the final polish.
People Also Ask
What is the average cost of a tub‑to‑shower conversion in Flemington, NJ?
A typical conversion ranges from $5,000 to $9,000, depending on the shower pan, fixtures, and any structural changes required. Local labor rates and permit fees can also affect the final price.Do I need a building permit for a tub‑to‑shower conversion in Flemington?
Yes, Flemington requires a permit for any plumbing or structural modifications, including shower pan installation. Obtaining the permit ensures the work meets New Jersey building codes and protects your home’s resale value.How can I prevent water damage when converting a tub to a shower?
Proper waterproofing is critical: install a high‑quality membrane, use a sloped shower base, and seal all seams with mold‑resistant sealant. Double‑checking the drain connection and testing for leaks before finishing will save costly repairs later.What shower pan options are best for a small bathroom?
Low‑profile acrylic or fiberglass pans are lightweight and fit tight spaces, while linear drains allow for a sleek, barrier‑free entry. Choose a pan with a built‑in slope to simplify waterproofing and ensure efficient drainage.Can I keep my existing bathtub plumbing when converting to a shower?
In many cases, the existing drain and water supply can be reused with minor adjustments, reducing labor costs. However, a professional plumber should evaluate the layout to confirm compatibility and code compliance.Flemington Bathroom Remodel brings over a decade of specialized bathroom renovation expertise to homeowners throughout Flemington, NJ. Their team combines skilled craftsmanship with a deep understanding of local design trends to deliver functional, stylish spaces. Committed to personalized service, they work closely with each client to ensure every project reflects the community’s unique character.
Need Bathroom Remodel?
We restore comfort and safety to homes in Flemington, NJ and surrounding communities (08822, 08844, 08848, 08861, 08873) with prompt, reliable service. Our technicians arrive on schedule and complete the job efficiently so you can get back to daily life.
Get Bathroom Quote